WlNCH MOTORS
SUB-SECTION 5K
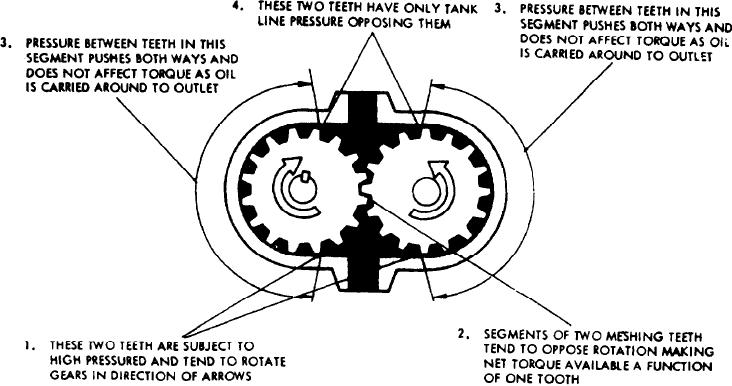
Figure 5K-6. Motor Operation
clear of the winch. Remove the motor to a suitable work
3. Unreeve the hook block, if necessary, to reduce the
area.
reeving to a single part of line. Attach the winch line to a
NOTE
choker chain attached to the towing hooks under the front
bumper. Take up the slack to stall the motor.
It is recommended that the motor be replaced with a
4. Start the engine and run it at high idle.
new motor, since the time required to replace the
motor is less than that required to overhaul it. It
5. Pull the winch lever back fully and hold it for 15
should also be noted that the volumetric efficiency of
seconds.
an overhauled motor will always be lower than that
NOTE
of a new motor.
The motor must remain stalled for the full 15
OVERHAUL
seconds.
GENERAL. It is suggested that before any work is done on
6. Measure the amount of oil that drained into the con-
this unit, all the steps for disassembly and reassembly be
tainer in that 15 second period. Two gallons drained in a 15
read carefully and understood.
second period represents an 80 percent efficiency level;
more than 2 gallons represents a lower efficiency level; and
Expendable parts such as oil seals, back-up rings, O-rings,
less than 2 gallons represents a higher efficiency level.
sealing strips, and separators should never be re-used even
though inspection may show them items as being service-
7. Reconnect the drain line upon completion of the test.
able for future use. The coat of these items is negligible
compared to the costs involved in replacing such items if
REMOVAL
they do not function properly.
To remove the motor, proceed a follows:
All replacement parts should be given your final inspection
to ensure that no damage has resulted after the final factory
1. Disconnect all the hydraulic lines attached to the motor,
inspection was made.
and cap the ends of the hydraulic lines to prevent the entry
of dirt into the hydraulic system. Plug the motor ports to
Cleanliness is of prime importance when any part of this
prevent the entry of dirt into the motor.
unit is disassembled or reassembled. Before starting disas-
sembly, be sure that a clean work area with a dust and grit
2. Remove the capscrews which secure the motor to the
free workbench is available.
winch. Pull the motor straight out until the motor shaft is
5K-6

