
SECTION II
CONTROLS AND OPERATION
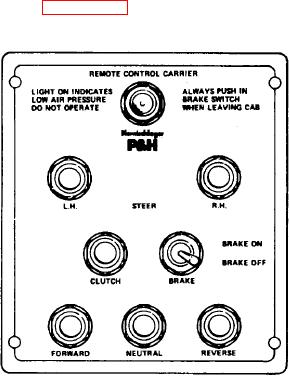
5. BRAKE. This toggle switch controls the operation of
CARRIER REMOTE CONTROLS
the carrier service brakes. Place the switch handle in the
up position to apply the brakes. Place the switch handle
GENERAL
in the down position to release the brakes.
The purpose of the carrier remote controls is to provide a
6. FORWARD. This button, when used in conjunction
means of moving the carrier, without having to leave the
with the Clutch button, shifts the main transmission into
upper cab.
first gear.
CONTROL IDENTIFICATION
7. NEUTRAL. This button, when used in conjunction
with the Clutch button, shifts the main transmission into
The controls provided on the carrier remote control panel
neutral.
are shown in Figure 2-11. The function of the controls
are as follows:
8. REVERSE. This button, when used in conjunction
with the Clutch button, shifts the main transmission into
reverse.
OPERATION
To operate the carrier by remote control, proceed as
follows:
CAUTION
The following instructions describe
the steps necessary to transfer
control of the carrier from the carrier
cab to the upper cab.
These
instructions
must
be
followed
carefully to ensure safe, proper
transfer of carrier control.
1. Perform the following function before leaving the
carrier cab:
Figure 2-11. Carrier Remote Control Panel
A. Shift the main transmission to neutral.
B. Shift the auxiliary transmission to low gear.
1. LOW AIR PRESSURE LIGHT. This lamp, when
C. Place the Remote Control Air Valve in the ON
illuminated, indicates that the air pressure is below the
position.
pressure required to operate the carrier by remote
D. Place the Throttle Selector Valve in the UPPER
control. Do not operate the carrier by remote control
position.
when this lamp is illuminated.
2. Go to the upper cab and place the Ignition switch in
the ON position. Then place the Brake switch in the
2. L.H. STEER. Depress and hold this button to turn
BRAKE ON position.
the front wheels to the left. The number of degrees that
WARNING
the wheels are turned vary with the length of time the
button is held depressed. Release the button to stop
Be sure the Low Air Pressure Light,
turning the wheels.
on the carrier dash panel, is not lit
before releasing the Maxibrakes. If
3. R.H. STEER. This button operates in the same
the light is lit, it is possible that the
manner as the L.H. Steer button, except that this button
carrier could move because the air
causes the wheels to turn to the right.
pressure is not sufficient to apply the
service brakes via the remote control
4. CLUTCH. This button controls the operation of the
system.
clutch. Depress and hold this button to disengage the
clutch. Release the button to engage the clutch.
1-2-17

