
SUBSECTION 6B
HORIZONTAL SWING SHAFTS
INSTALLATION. To install the horizontal swing shaft, pro-
13. Slide shaft (05) and bearing (23) into sprocket and hub
ceed as follows:
(22). Be sure bearing (23) fits firmly against the shoulder in
the sprocket.
1. Replace O-ring in the clutch housing. Place shims (08
14. Install pinion (04), washer (03), capscrews (02) and
and 09) on the studs extending from the chain case. Apply a
coat of number two Permatex to the threads of the studs.
lockwire (01) on shaft (05).
2. Attach the swing shaft assembly to the chain case In-
15. Press seal (28) into drum (24). Be sure the seal seating
stall and tighten washers (19) and nuts (18).
surface on spacer (30) is clean and free from nicks and
burrs, since minor shaft imperfections can wear seal lips
3. Install the clutch assembly on shaft (05) and secure in
rapidly.
position with washers (06 and 31) and locknut (07).
16. Install O-ring (29) in spacer (30) and slide the spacer
4. Install and adjust the drive chain, chain case cover and
into position on shaft (05), being careful to avoid damage to
gasket (see Subsection 4E).
seal (28).
5. Connect the hydraulic line to the clutch and open the
petcock at the hydraulic reservoir. Bleed the line from the
reservoir to the clutch (see Subsection 5A).
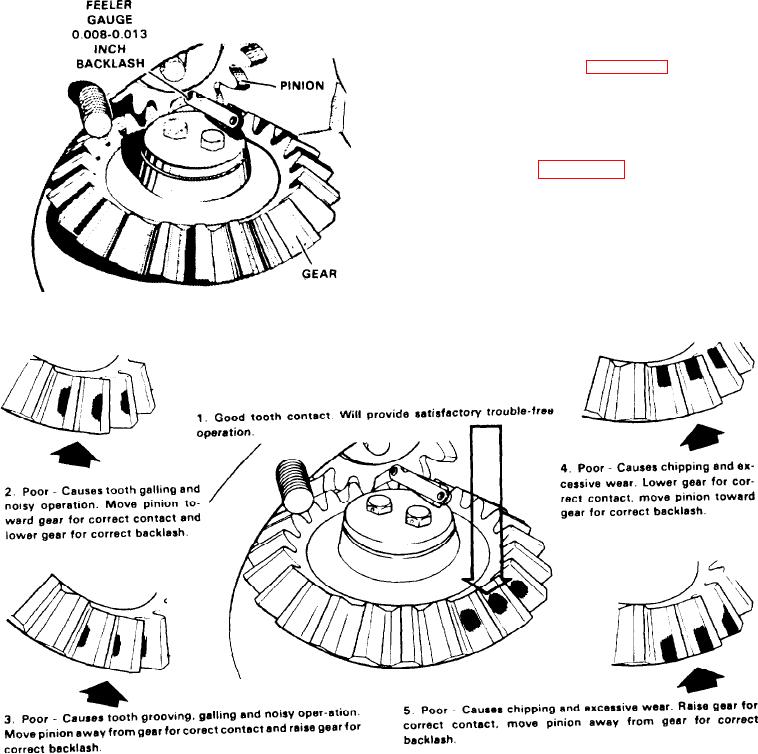
6. Check the backlash between pinion (04) and the vertical
swing bevel gear as shown in Figure 6B-1 Adjustment is
made by means of the shims located beneath the vertical
swing shaft bearing retainers (see Subsection 6D).
7. Check the bevel pinion gear contact, using a thin coat-
ing of Prussian blue or white lead on one gear. Rotate the
gears together under no load to determine contact on the
gear teeth as shown in Figure 6B-2. Correct any poor con-
tact condition as shown.
8. Lubricate the assembly with multipurpose grease
through fitting (12).
NOTE
Fitting (11) is a relief fitting. When grease backs up
through the relief fitting, stop adding lubricant. Be
careful not to overlubricate fittings (12) since dam-
Figure 6B-1. Checking Backlash
age to seals could result.
Figure 6B-2. Checking Tooth Contact
6B-2

