returned to radiator through upper connections, or
through the bypass line for recirculation through system.
securing shroud to radiator, then remove shroud.
When engine is operating, air is drawn through radiator
(g) Install in reverse order.
core by the fan to cool and maintain correct operating
(2) Radiator.
temperature of the engine. The six-blade fan is driven
Note.
Provide lifting device that will
by a single belt.
reach through cab side door and couple close to
b. Crane-Shovel Unit Model 855BG2. All of the
radiator.
crane-shovel units of this model, except the fourteen
(a) Remove fan guard and shroud ((1)
described in c below, are equipped exactly the same as
above).
in a above.
c. Winterized Crane-Shovel Units Model 855BG2.
capscrews and lockwashers, lift radiator off of pad and
The fourteen winterized crane-shovel units model
out of side door.
855BG2 have the following additional components in the
(c) Remove pad and support from
cooling system: coolant heater, coolant lines through oil
mounting bracket.
pan, and a coolant circulating pump. The coolant heater
(d) Install in reverse order.
heats the coolant and oil in engine as an aid to cold
b. Removal and Installation (Engine Model
weather starting.
D333TA).
3-101. Radiator, Shroud, and Fan Shroud
(1) Fall guard and shroud.
a. Removal and Installation (Engine Model 687C-
18-ES).
guard.
(1) Fan guard and shroud.
(b) Shroud is welded to this radiator and
is not ordinarily removable at organizational
(b) Remove radiator outlet (bottom) hose
maintenance.
(2) Radiator.
suction side of water pump.
Note.
Provide lifting device that will
reach through cab side door and couple close to
radiator.
and flatwashers, then remove pipe flange from
(b) Remove fan guard ((1) above)
thermostat housing (fig. 3-81).
radiator.
secures fan guard to shroud, then remove fan guard.
(d) Install in reverse order.
3-102. Fan
a. Fan and Sitpport Bracket (Engine Model 687C-
18-ES).
(1) Removal and installation.
and support bracket.
(c) Install in reverse order.
(2) Cleaning, inspection and repair.
(a) Clean al' parts in an approved
cleaning solvent and dry thoroughly.
(b) Visually inspect all parts for cracks,
breaks, damaged threads, or other defect.
(c) Repair by replacing defective parts or
mounting hardware.
b. Fan (Engine Model D333TA).
(1) Removal and installation.
(b) Install in reverse order.
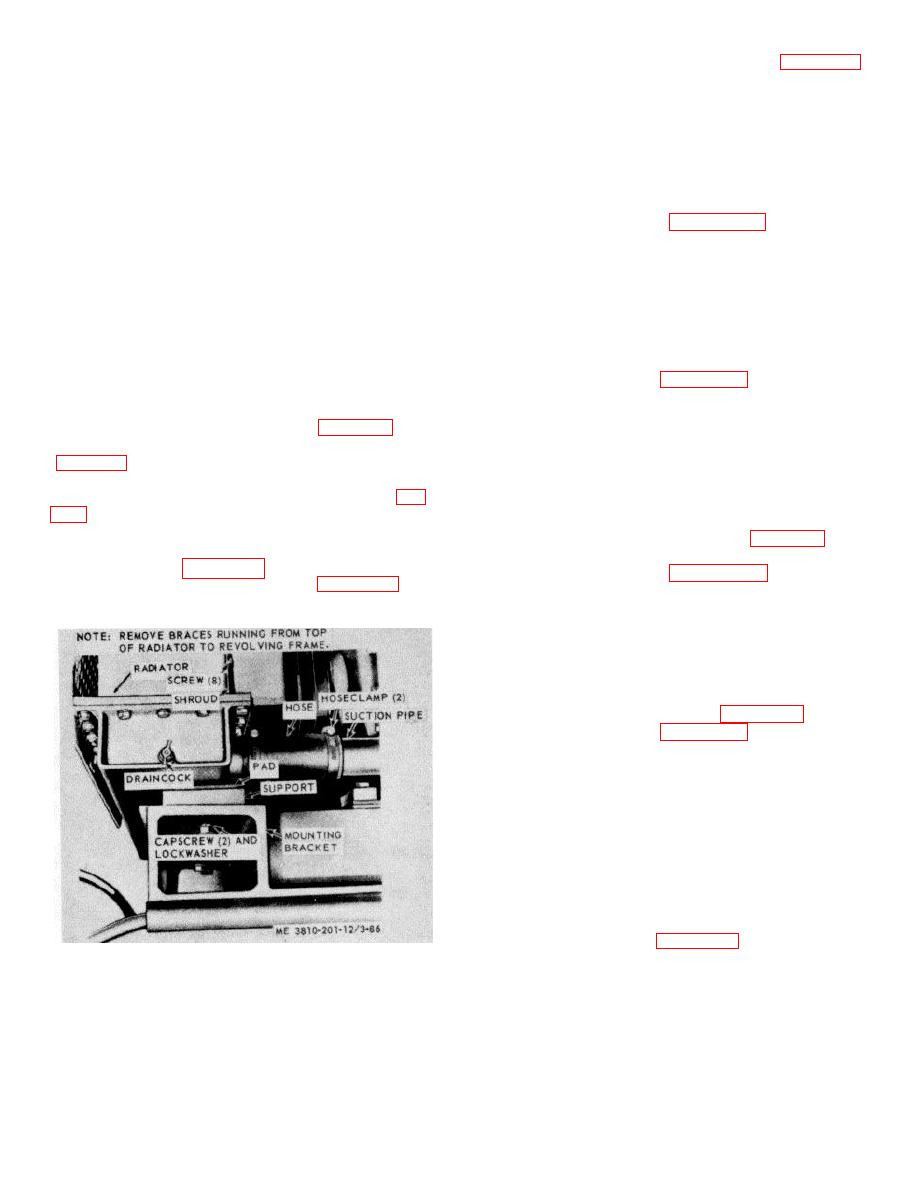
Figure 3-86. Radiator removal points.
(2) Cleaning, inspection and repair.
(a) Clean all parts in an approved
cleaning solvent and dry thoroughly.
(b) Visually inspect fan blades for bends,
cracks, or other damage. Inspect mounting hardware
for burs or stripped threads.
3-99


