install pins through sockets and secure with cotterpins.
(7) Connect wire ropes to jib boom point,
install pins and secure pins with cotterpins.
(8) Connect longer wire ropes to eyebolt of
turnbuckle, connect turnbuckle to crane boom foot,
install pins and secure with cotter pins.
(9) Refer to figure 2-7 and reeve crane hook
block and jib boom hoist cables.
(10) Raise boom (para 2-12b).
b. Removal of Jib Boom.
(1) Move crane-shovel unit into position for
placement of jib boom then build cribbing (fig. 4-19).
(2) Lower jib boom weighted hook to ground,
remove clamps, then cable from weighted hook. Wind
cable onto hoist drum.
Note.
If crane boom is to be removed,
remove hook block in a manner
similar to (2) above, winding cable
onto digging drum.
(3) Lower boom (para 2-12b) until jib boom
rests on prepared cribbing, then disconnect two pendant
wire rope turn buckles from crane boom foot.
(4) Remove capscrew, lockwasher, and
keeper rod securing jib to boom point pin, then remove
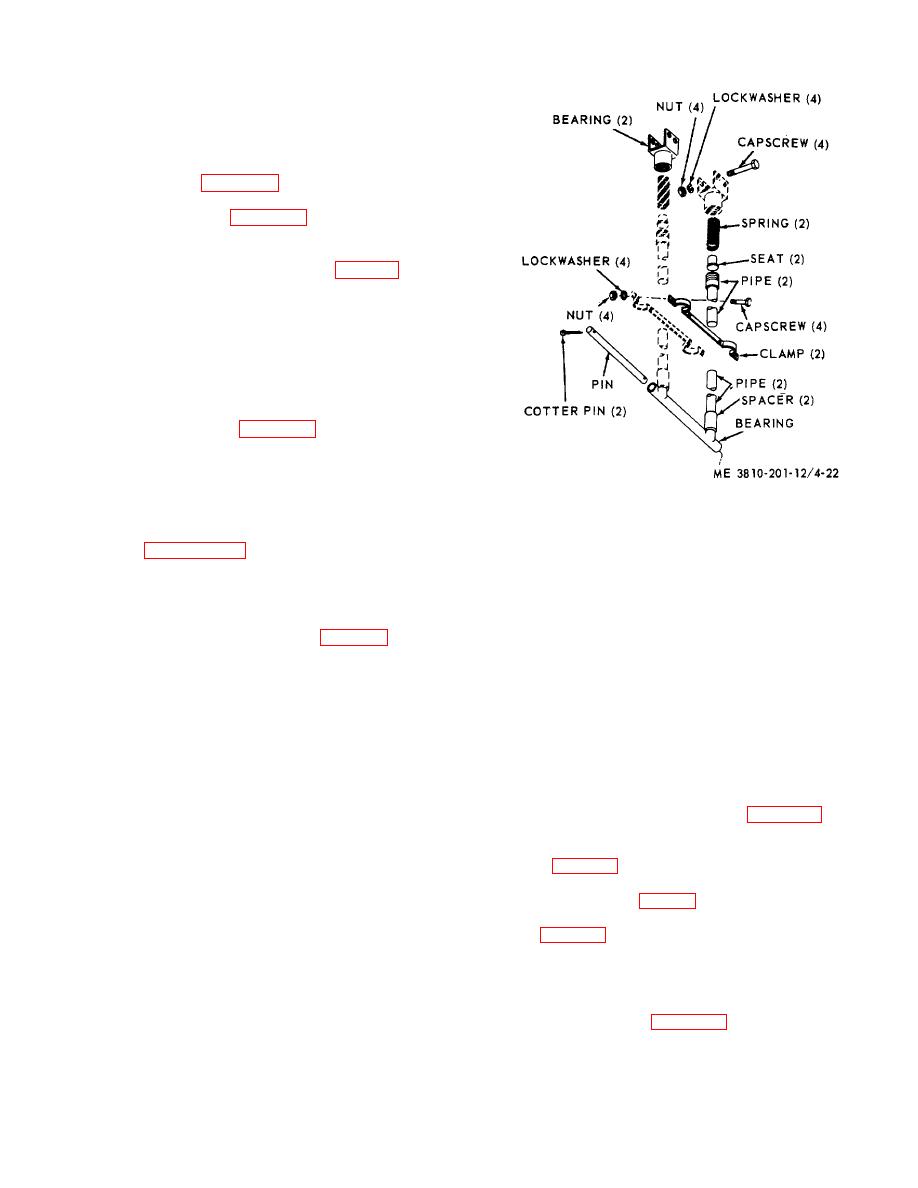
Figure 4-22. Boom backstop, removal, disassembly,
pin.
reassembly, and installation.
Note. If crane boom is to be removed, proceed
as directed in paragraph 4-2.
(6) Reassemble by reversing procedure of
(5) Move crane-shovel unit away from
steps (1) through (5) above.
cribbed jib boom.
d. Cleaning, Inspection, and Repair.
c. Disassembly and Reassembly.
(1) Clean all parts with an approved cleaning
(1) Remove cotterpins, pins, and two
solvent and dry thoroughly.
turnbuckles from pendant wire ropes (fig. 4-21), then
(2) Visually inspect jib boom for cracks,
remove cotterpins and pins from pendant wire ropes and
breaks, or bent sections. Inspect sheave pins and
remove wire ropes from jib boom and strut.
shafts for excessive wear. Inspect mounting hardware
(2) Remove capscrew, lockwasher, and
for stripped threads or elongated holes.
keeper rod securing strut sheave pin; remove sheave
(3) Repair breaks and cracks by welding,
pin, spacer and sheave from strut. Remove fitting and
straighten all bends, and replace all worn, damaged, or
bushing from strut sheave pin.
defective parts.
unless replacement is required.
4-22. Boom Backstop
(3) Remove four cotterpins from two strut
a. Removal and Installation.
pins, remove pins, then remove strut from jib boom.
(1) If necessary, raise boom (para 2-12b) to a
(4) Remove three nuts and lockwashers from
moderate angle and take pressure off mounting
two capscrews and bolt, remove bolt and capscrews,
hardware; remove four nuts, lockwashers, and
then remove sheave guard.
capscrews (fig. 4-22) then lift two bearings from gantry.
(5) Remove nut, lockwasher, capscrew, and
(2) Lower boom to a horizontal position with
keeper rod securing jib boom point sheave shaft,
cribbing at boom point (fig. 2-6).
remove shaft, spacer, and sheave. Remove fitting and
(3) Remove two cotterpins from pin securing
bushing from sheave shaft.
bearing (fig. 4-22) at boom; drive pin from bearing, then
Note.
Do not remove bearings unless
remove boom backstop.
replacement is required.
(4) Install in reverse order.
b. Disassembly and Reassembly.
(1) Slide bottom bearing, spring, seat, and
pipe as an assembly (fig. 4-22) off of two pipes
connected to upper bearing; unscrew two pipes from
4-20


