SUB-SECTION 9C
AIR SYSTEM COMPONENTS
eriod, the oil and water will separate and a visual inspec-
tion wilt show the percentage of oil and water in the mix-
ture. The next time you drain the reservoir remember that
in all probability only a small percentage of the drainage is
oil.
ROUTINE INSPECTION. There is probably no other de-
vice in the air system requiring simpler maintenance and
yet more important maintenance than the reservoirs.
Many an efficient reservoir arrangement has been defeated
in its normal function through haphazard maintenance.
Any collector of unwanted oil and water condensation will
fail in its function if it is not properly and regularly
drained. The simple routine of draining all the reservoir
daily will pay dividends far beyond what is generally recog-
nized.
Also when we say drained, we do not mean to open the
drain cock and let the air out. Satisfactory draining is only
accomplished by leaving the drain cock open after the air
has escaped and until all drainage stops.
MINOR REPAIRS. Minor repairs to a reservoir consist of
examining the reservoir mounting and the inspection of the
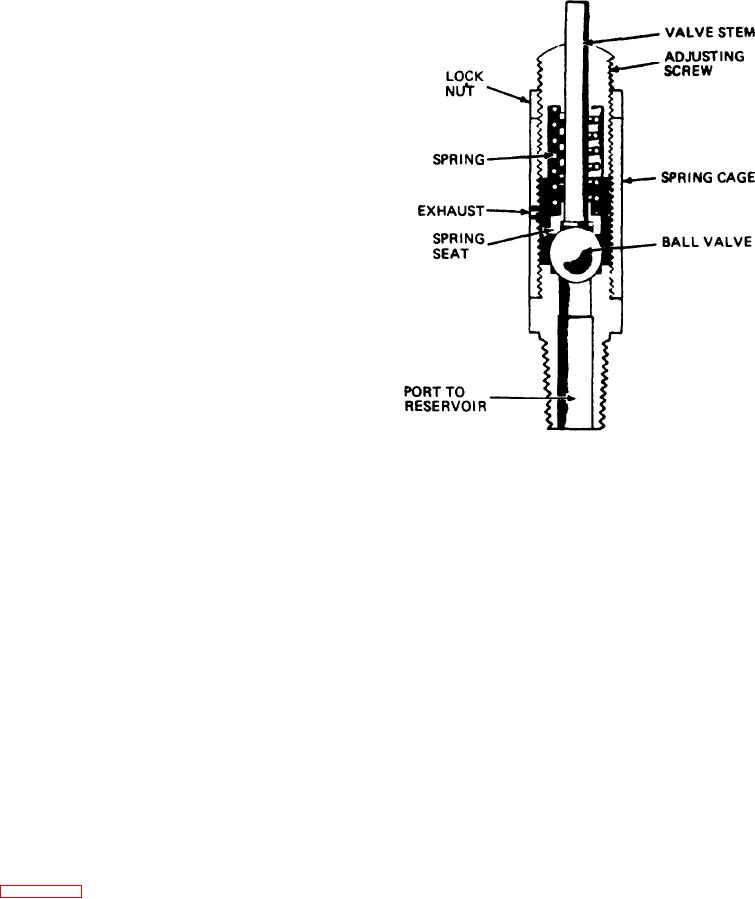
Figure 9C-2. Safety Valve (36Z6)
outside for corrosion or damage. The outside should be
kept painted because based on actual experience the pos-
sibility of corrosion causing a failure except from the out-
OPERATING TEST. The safety valve may be tested to be
side is very remote.
sure it is operative by pulling the exposed end of the valve
stem. This removes the spring load from the ball and per-
MAJOR REPAIRS. Except in unusual cases, major repairs
mits the valve to exhaust. If the safety valve does not "blow
on reservoirs are not economical or practical. If a reservoir
off" when this is done, the ball must be stuck on its seat.
has been damaged so as to be unfit for use, it is most
The valve should be removed and disassembled for cleaning.
economical to replace it with a new one.
LEAKAGE TEST. Leakage at the exhaust port should not
In exceptional cases where the inside of the reservoir has
exceed a three-inch soap bubble in three seconds.
become excessively coated with sludge which cannot be
drained off, it is sometimes advisable to remove it and clean
PREVENTIVE MAINTENANCE. Every year or after every
it out with steam and hot water.
50,000 miles (60,467 km) of operation, the safety valve
should be removed and cleaned as follows (see Figure
9C-3) :2.
SAFETY VALVE (3626)
1. Unscrew the spring cage from the body of the safety
valve. Lift the bell valve from the body and remove the
DESCRIPTION. The safety valve protects the air system
against excessive air pressure above 150 pounds (10.34
spring, spring seat and release pin from the spring cage.
BARS). Should the reservoir pressure below the ball valve
2. Clean all parts in cleaning solvent. Inspect the parts for
rise to a point above the setting of the safety valve, the
force developed will overcome the force of the regulating
excessive wear, cracks or damage. If wear or damage is ex-
spring holding the ball on its seat, and the ball will lift (see
cessive, the complete safety valve should be replaced.
Figure 9C-2). This permits air to pass up into the spring
cage and exhaust to atmosphere through the exhaust port.
3. Place the ball valve in the body of the safety valve. Place
As soon as this exhaust process reduces the pressure to the
the spring release pin and spring seat in the spring cage with
the adjusting screw assembly. Position the spring seat over
setting of the safety valve, the regulating spring forces the
the ball valve and screw the spring cage to the body.
ball back on its seat, stopping the exhaust.
9C-3

