AIR SYSTEM COMPONENTS
SUB-SECTION 9C
INSTALLATION. To install a new or overhauled valve. pro.
1. Be locknut before the knob can be removed. Then remove
ceed es follows:
the locknut.
2. Disconnect the air lines connected to the valve.
NOTE
If a new valve is being installed, it will be necessary to
3. Remove the mounting bolts end nameplate. Then re-
remove the knob and locknut.
move the valve.
OVERHAUL. Overhaul of this valve is limited to the re-
1. Position the valve on the underside of the dash panel.
placement of two grommets, two O-rings end a gasket. To
Then install the nameplate and secure the valve to the dash
replace these parts, proceed as follows (see Figure 9C-9):
panel with the mounting bolts.
1. Using a suitable wrench, unscrew the cap from the body.
2. Install the locknut and knob. Then connect the air lines
Remove the gasket from the cap.
to the valve.
2. Carefully push the plunger out the bottom of the body,
3. Check the operation of the valve by performing the
by pushing on the knob end of the shaft. Remove the two
Leakage Test.
grommets and the two O-rings on the plunger.
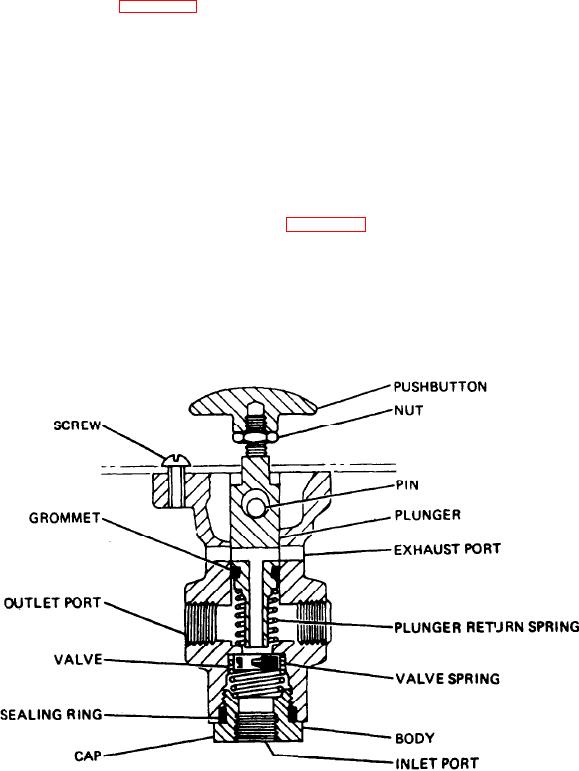
DIFFERENTIAL LOCKOUT VALVE (36Z289)
3. Wash all the remaining parts in cleaning solvent.
DESCRIPTION. Differential lockout valve 36Z289 is a
palm operated, spring returned, two way air control valve
4. Install the grommets end O-rings on the plunger as
(see Figure 9C-10). The valve is used to control the opera-
shown in Figure 9C-9.
tion of the interaxle differential.
5. Carefully install the plunger in the body. Be sure the
When the palm button of the valve is in the depressed posi-
grommets end O-rings do not extrude when the plunger is
tion, the valve is on, Its inlet valve is off its seat and the
installed in the body.
exhaust is closed. In this position, air has free passage
through the valve to the interaxle differential lockout cylin-
6. Install the gasket on the cap. Then install the cap on the
der.
bottom of the body.
Figure 9C-10. Differential Lockout Valve (36Z289)
9C-11

