c. Cleaning, Inspection and Repair.
(3) Replace damaged or defective windshield
wiper motor.
(1) Clean all metal parts with an approved
d. Reassembly.
Refer to figure 5-48 and
cleaning solvent and dry thoroughly.
reassemble the wiper motor as illustrated.
(2) Inspect all parts for cracks, breaks, and
e. Installation. Install wiper motor (TM 53810-232-
proper operation.
12).
Section XI. UTILITY BLADE AND PUSH BEAM
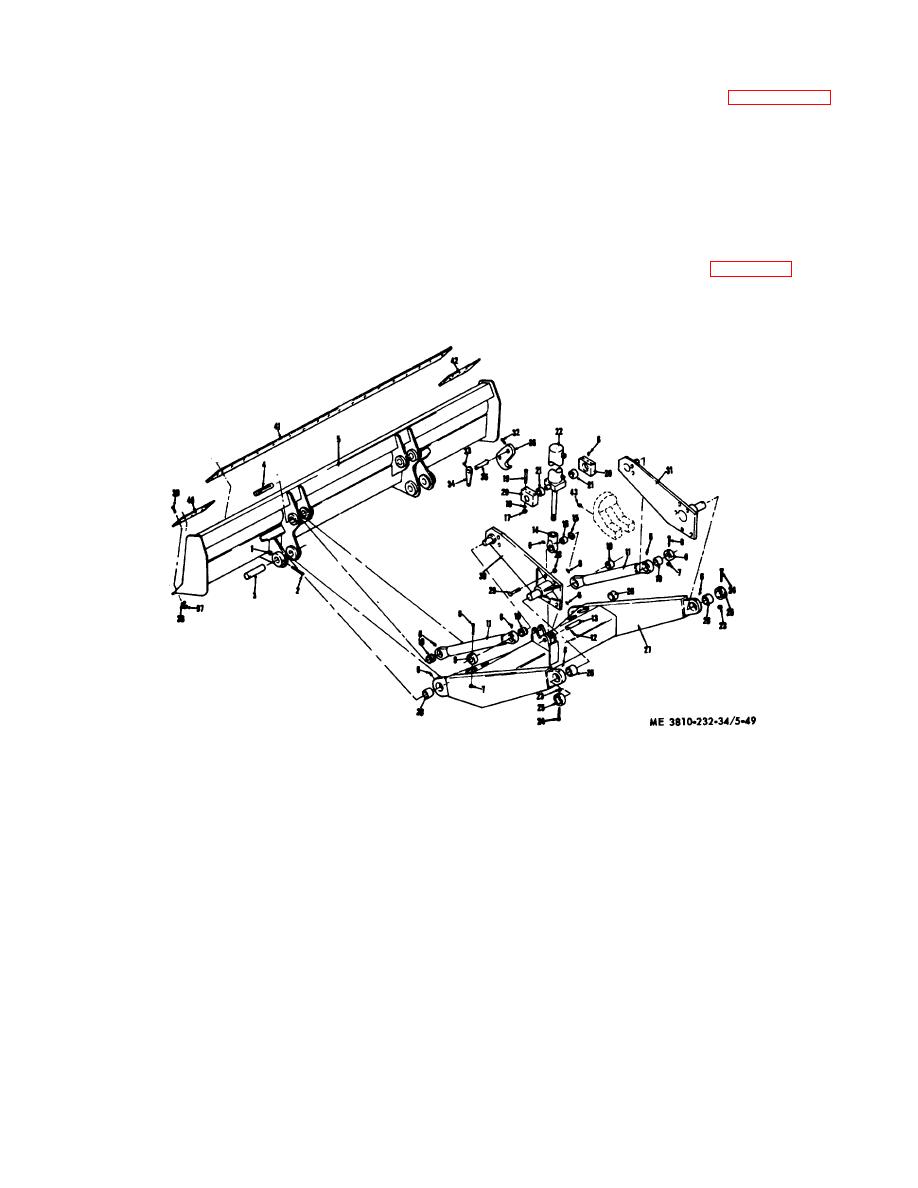
a. Removal. Remove utility blade assembly (TM
5-40. General
53810-232-12).
The utility blade is mounted on the push beams attached
b. Disassembly.
Disassemble utility blade in
to the carrier frame. The blade is raised and lowered
numerical sequence as shown on figure 5-49.
hydraulically from the operator's cab.
5-41. Utility Blade
1
Nut, self-locking
15
Ring, retaining
29
Screw, cap
2
Screw, cap
16
Double seal bushing assy.
30
Arm mounting plate R.H.
8
Pin
17
Nut
31
Arm mounting plate L.H.
4
Pin
18
Washer, lock
32
Pin, spring
5
Bowl
19
Screw, cap
33
Pin, spring
6
Fitting, lube
20
Block bearing, cylinder
34
Lever arm
7
Nut, self-locking
21
Double sealed bushing assy.
35
Shaft
8
Screw, cap
22
Cylinder assembly
36
Hook
9
Collar
23
Nut, self-locking
37
Nut
10
Bushing
24
Screw, cap
38
Washer, lock
11
Upper arm
25
Collar, casting
39
Bolt, plow
12
Pin
26
Bushing
40
End bit dozer L.H.
13
Pin
27
Push beam
41
Dozer cutting edge
14
Eye, lifting
28
Nut, self-locking
42
End bit dozer R.H.
43
Lube fittings
Figure 5-49. Utility blade assembly, exploded view.
5-103


